Important!
- Surfaces to be taped and sealed must be clean, dry, and grease-free.
- All joints and penetrations must be tight and completely sealed to achieve proper functionality in radon protection.
- As a splicing aid, use only the accessories recommended in the system.
- Consider installation on sunny warm days with cold nights (spring and autumn). Large temperature variations can cause the radon membrane to expand and contract noticeably. Installing the membrane in deliberately shorter lengths results in less expansion and contraction (waves, creases…).
- The assembly should be carried out at temperatures that favor the application of joint aids such as tape, butyl compound, and sleeve. In cooler weather (<+10°C), preheat all components before assembly. Gently heat with a hot air gun during application if necessary. At temperatures ≤ +5°C, supplement the sealing of the joint with T-Fix Adhesive and sealing compound.
- The membrane should be inspected for damage before installation and covering. Any damage should be repaired and sealed with joint aids and/or a possible patch of the membrane.
- The use on moisture-prone surfaces (such as concrete) should be dimensioned according to its moisture content. The membrane exhibits waterproofing properties equivalent to a so-called moisture barrier (see reported vapor resistance) and should be used accordingly.
- When burying, ensure that any fill material above the membrane is radon-free!
- If uncertain about radon measures or moisture problems in the foundation, contact an expert for consultation.
- The products should be stored protected from sunlight and precipitation, and at normal storage temperature.
- After installation, all components of the system should be incorporated into the structure as soon as possible to protect against sunlight (UV) and precipitation.
1. General assembly
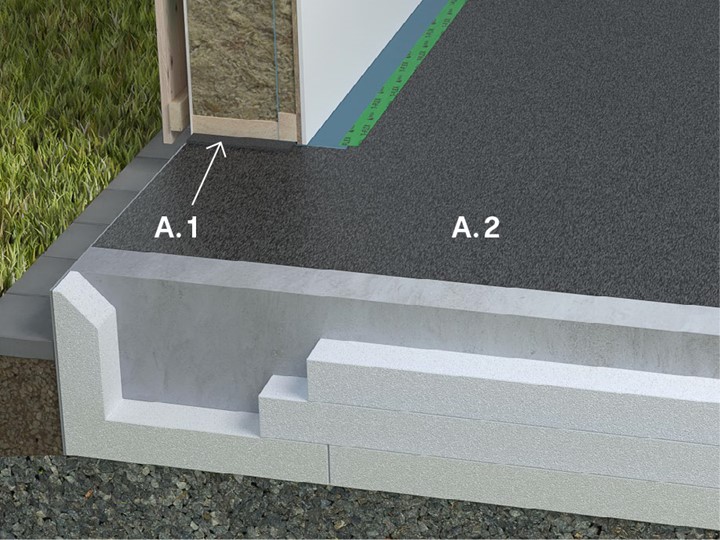
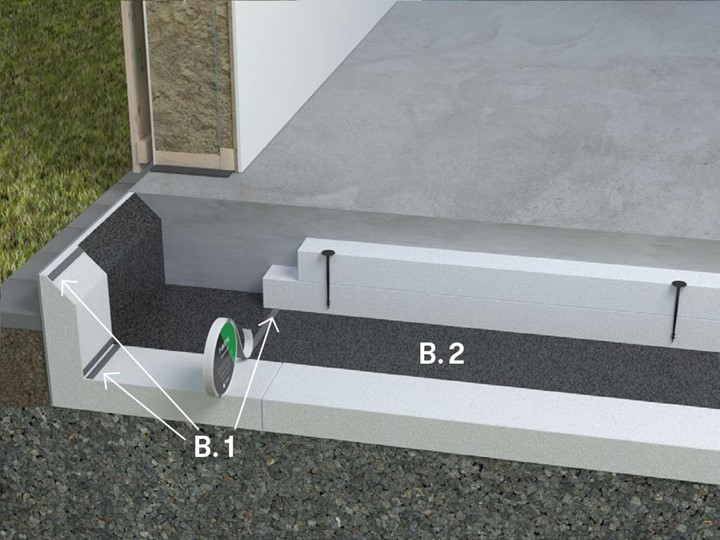
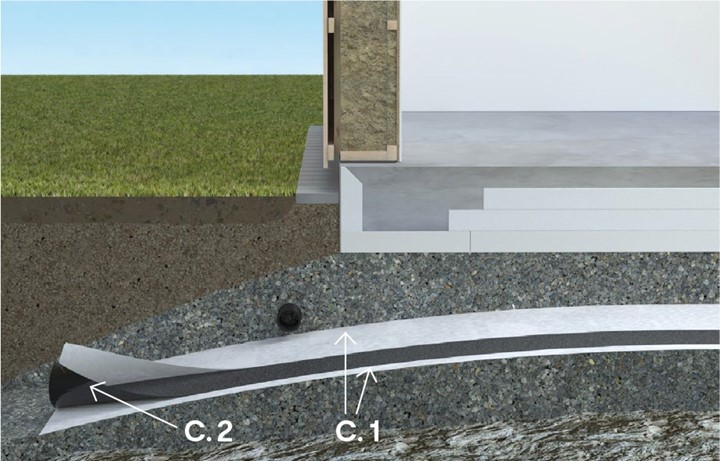
Radon Membrane Super is installed comprehensively with the friction coating facing upwards on or in the concrete slab or in the ground beneath the foundation. The membrane forms a durable, airtight, and radon-proof system. Installation performed on top of the concrete slab according to A. in the figure alternatively on the bottom layer of foam plastic (foundation insulation) further up on the inside of the base element according to B. or in the ground at the excavation bottom according to C. The substrate
should always be stable, smooth, and free from sharp objects or organic debris. The best conditions for an airtight and radon-protective solution are achieved in new construction where the radon membrane can shield the foundation surface as comprehensively as possible. Joints and penetrations should be sealed to prevent radon gas from seeping into the building.
A. During installation, sills for walls that are to be mechanically anchored should be equipped with sealing T-Syll sill insulation (A.1). Climate screens from exterior walls are preferably connected airtight down to the Radon membrane (A.2). At terminations to surfaces that should not or cannot be covered with the membrane (e.g., tiles in wet rooms, glued floors), the membrane is sealed with T-Butyl joint tape against a pre-treated concrete surface with asphalt primer K-80. Ensure afterward, when laying flooring on this surface, that a waterproof layer similar to a wet room waterproofing is applied and tightly connected to the membrane edge termination. Alternatively, a casting on the membrane can be made of at least 30mm reinforced concrete on surfaces to be covered with, for example, tiles.
1. General Assembly cont.
B. For installation, extra care should be taken as the solution is more complex and requires extra attention to detail. Mechanical fastening for the insulation layers, such as plastic plugs/nails, must not go through and penetrate the Radon membrane (B.2). Use double-sided T-Butyl Splicing Tape (B.1) between the membrane and the second layer of insulation to secure the foam boards in the upper layer. At internal corners against edge elements, an extra piece of the membrane should be cut to overlap at least 200mm if the cut is in the assignment. Perform sealing and overlap joint here as a regular joint. Otherwise, avoid length joints across the internal hollow core and vertical upturns on, for example, the edge element. Roll the membrane as much as possible along the edges of the slab in full widths.
C. For installation, it is required that the trench bottom is leveled and compacted, stabilized, and executed in such a way that water drainage is ensured from the Radon membrane (C.2) to the ground outside the foundation's outer edges. Standing water should not occur! The excavation bottom should be executed according to the current version of AMA-Anläggning. The membrane should be laid at least 2m outside and around the foundation's outer edges. The membrane should be protected directly underneath (against the bottom) and above (against fill materials) by layers with Geo T, N3 Geotextile fabric (C.1). The upper layer of geotextile, on the radon membrane, can be replaced by at least 20mm of sand if necessary.
2. Joints
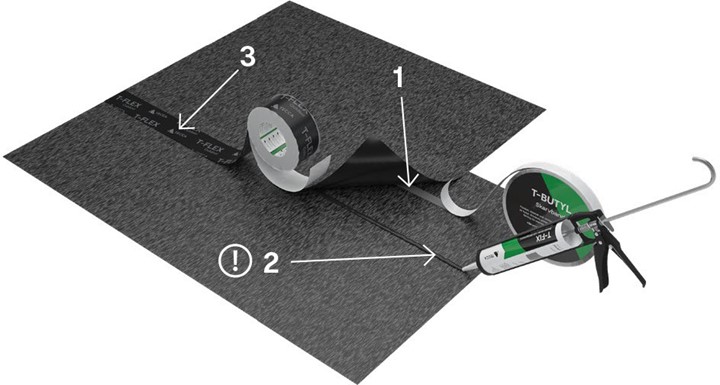
Joints in the membrane are made with a minimum 200 mm overlap with accompanying sealing. The sealing in the system consists of double-sided T-Butyl Joint Tape (1). which is placed in the middle of the overlap. Press the tape firmly against the surface with the protective paper on. Ensure it adheres and then remove this protective paper. Secure and press the overlapping membrane sheet carefully. In colder weather (≤ +5°C), supplement T-Butyl Joint Tape with T-Fix adhesive and sealing compound (2) in a strip about 5 cm from the overlap and edge. Finish by completely sealing and protecting the joint edge with the single-sided sealing tape T-Flex Outdoor (3). Application is done carefully with hand and foot pressure or roller!
3. Penetrations
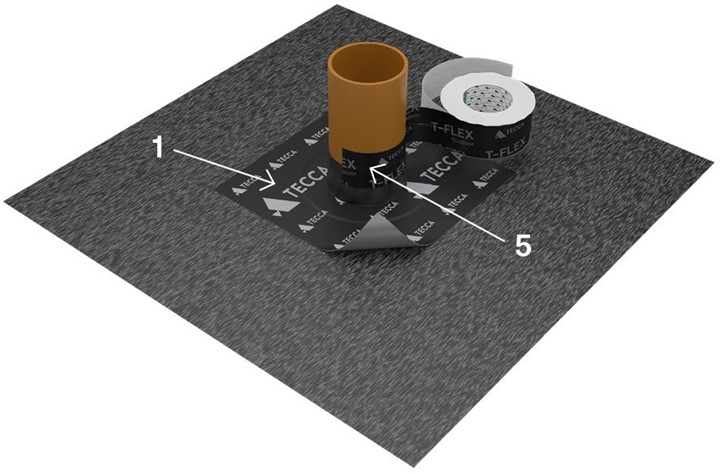
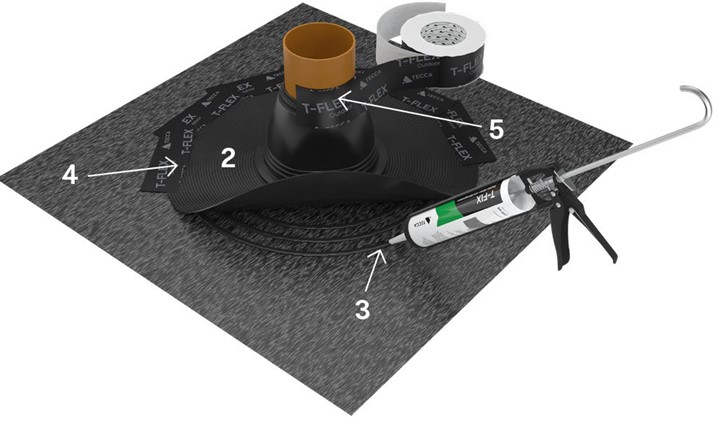
Sealing of round penetrations is most easily performed in the system with associated sleeves. The sleeve will overlap the hole in the membrane and form a tight connection to the pipe or hose. Rubber sleeve equipped with self-adhesive underside of butyl adhesive T-Sleeve Butyl (1) is available in various standard diameters. Remove the protective paper under the flange. Press the flange against the surface and secure the flange with a roller. Flange entirely made of rubber that is not self-adhesive
Flange, Rubber (2) is mounted the same way but glued to the surface with the accessory T-Fix adhesive and sealant, (3) in three strands with completely sealed rings. This fitting is taped after curing, protected at the edge with sealing tape T-Flex Outdoor (4). Seal the top of the sleeve around the pipe/cable with either a hose clamp or T-Flex Outdoor (5). Air tightness is important to achieve at the top and bottom of the duct!
