Important!
- The moisture protection mat should be stored before installation to avoid UV radiation (sunlight). Once installed, the entire product should be concealed. This is to ensure aging resistance.
- Follow the assembly instructions carefully. Ensure that the necessary drainage is achieved.
- Note that lower installation temperatures can affect the system's various components and impair elasticity and strength.
- Dry weather and dried/cleaned surface during installation contribute to a good result.
- During installation, consider strong sunlight and the movements of the moisture protection mat due to larger temperature differences.
- Use only compatible and approved accessories.
1. Preparations
Brush the wall clean of loose dirt, knock away any irregularities, and repair damaged joints and larger damages on the wall. If the wall lacks plaster on the lower part, plaster it with cement mortar as a base for the foundation membrane.
If the base plate protrudes outside the basement wall, fill the angle between the wall and the plate with cement mortar so that a beveled edge is formed (cove).
If you suspect there are existing moisture damages, we recommend contacting a professional. It is important that an investigation is conducted so that remediation and action proposals are made correctly.
Note that lower installation temperatures (<+5°C) can affect the system's various components and reduce elasticity and strength. Drying times and adhesion are significantly impaired at colder temperatures. Avoid winter installation. The floating membrane is sensitive to frost, and the self-adhesive adhesive membrane also adheres less effectively!
2. Drainage
No matter what type of moisture protection you choose for the basement wall, a well-functioning drainage system is required for a good result.
If there are problems achieving sufficient slope - contact the municipal technical office, the drainage may possibly be connected to the wastewater line. The drainage is surrounded with at least 100 mm of gravel 8-16. We recommend using Tecca geotextile fabric Geo-T N2 around the drainage material to prevent fine material from clogging the drainage pipe.
3. Installation of foundation wall membrane, 3 options

For self-adhesive Membrane, apply Primer K-80 from halfway up the base plate and approximately 300 mm up the wall. After drying time, apply the self-adhesive Membrane so that it covers the treated surface. Use a heat gun, carefully, at lower temperatures (<+10°C) or as needed.
Alternatively, a Weldable foundation wall membrane is applied with hot air to the dry (must not be sticky and uncured) primer-treated wall.
Or Tecca Floating Membrane (water-based/summer time). A sealing compound applied in 2 layers (1 kg/sqm/application) from halfway up the base plate and approximately 300 mm up the wall. Allow to dry between applications.
4. Installation of the moisture barrier mat T-Spärr

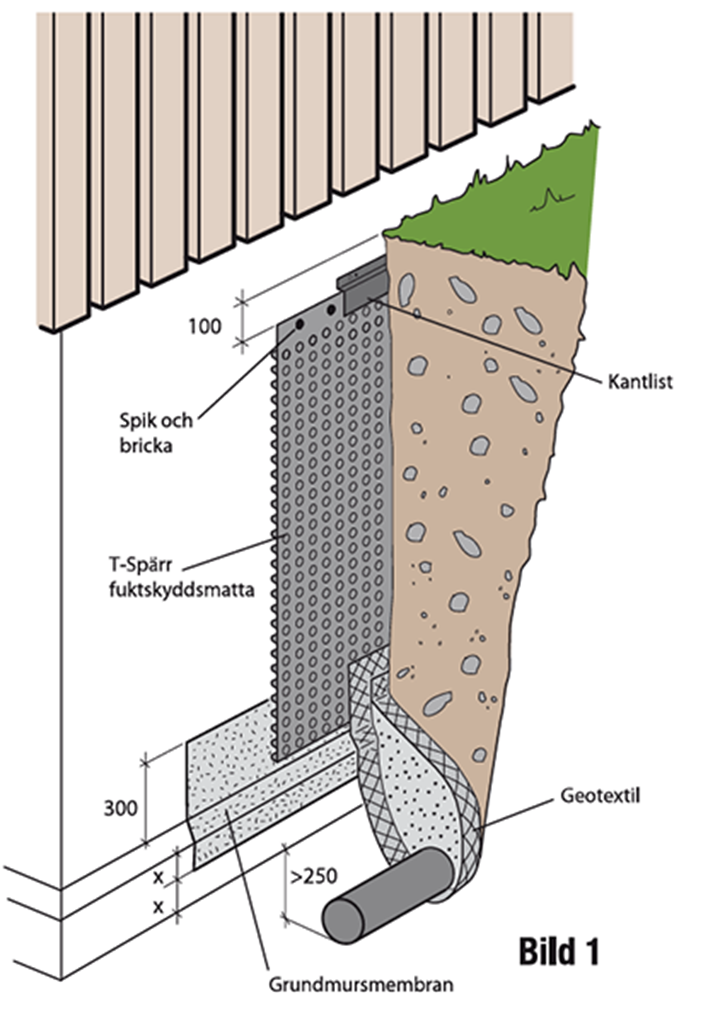
Roll out the moisture barrier with the spacers towards the wall and with the flat edge facing upwards. The lower part of the mat ends approximately 100 mm above the cove. Secure the mat at the upper edge with nails, washers, and finish securely with an edge strip (Image 1). The nail spacing is 250 mm. The lower edge is fixed under the backfill.
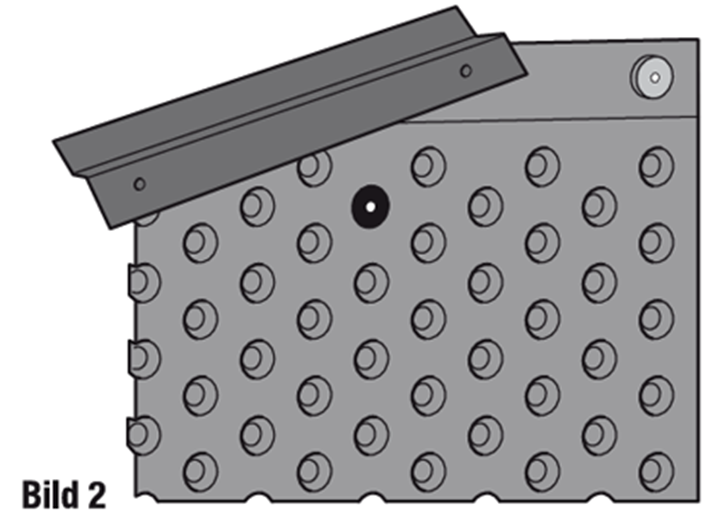
On uneven ground lines, the flat part is cut away and an edge strip is attached at the top (Image 2) to prevent soil and dirt from falling into the air gap.
When joining, overlap the mat horizontally by a minimum of 100 mm and vertically by 500 mm, avoid joining closer to corners than 1500 mm. The upper edge of the mat is adjusted to end approximately 100 mm below the finished ground level, with a nail spacing of 250 mm.
NOTE! When making penetrations in the moisture barrier, be careful with the seals around the hole! Use the intended sleeve/sealing tape!
5. Installation of T-Barrier and insulation

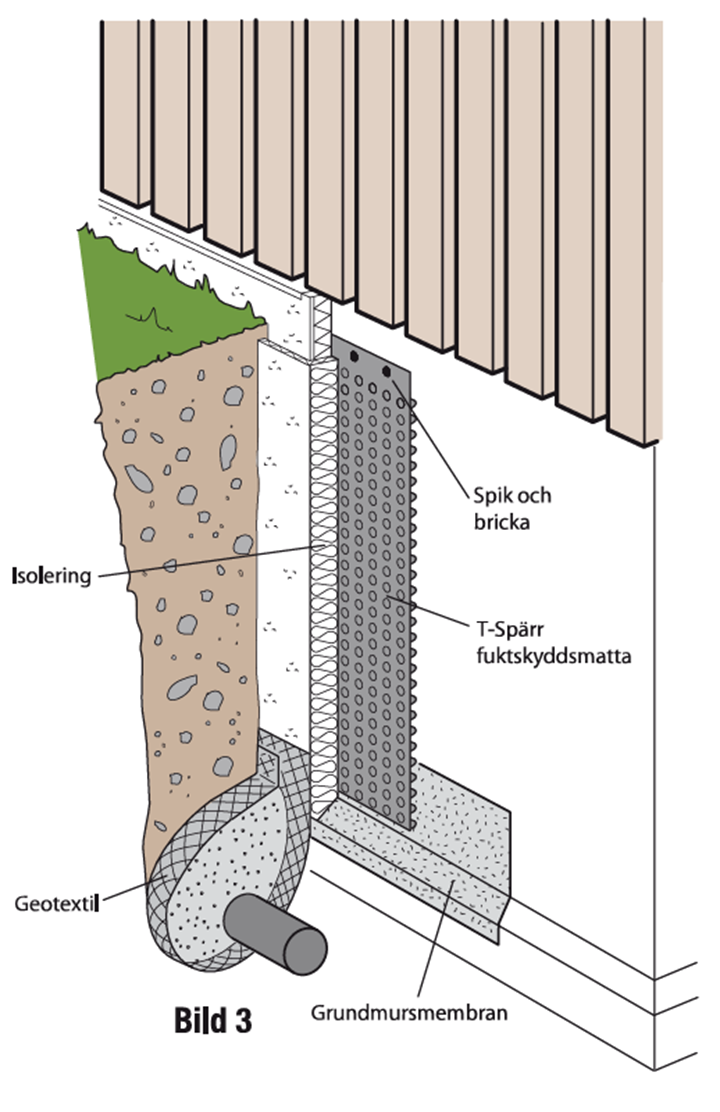
If you want to reduce heat loss through the basement exterior wall or raise the wall's temperature to achieve a drier wall, you can insulate with a suitable ground board after installing the moisture barrier. The boards are placed against the moisture barrier and held in place as the backfilling is done gradually as the insulation is installed.
6. Backfilling
During backfilling, existing masses can generally be used. Large sharp stones that can damage the moisture protection mat or insulation should be removed. It is also important during backfilling that the lower part of the mat is pressed firmly against the foundation wall, as no nailing occurs there. Consider the risk of settling and pack, compress well during backfilling.
T-Barrier, moisture protection mat
For interior basement outer wall
1. Installation of moisture barrier basement exterior wall – inside

The basement outer wall does not become drier by installing a moisture protection mat on its inside. However, this placement can be an option if you plan to install a moisture-sensitive material in the basement wall (e.g., plasterboard or wood paneling). Feel free to contact a moisture expert if you are unsure.
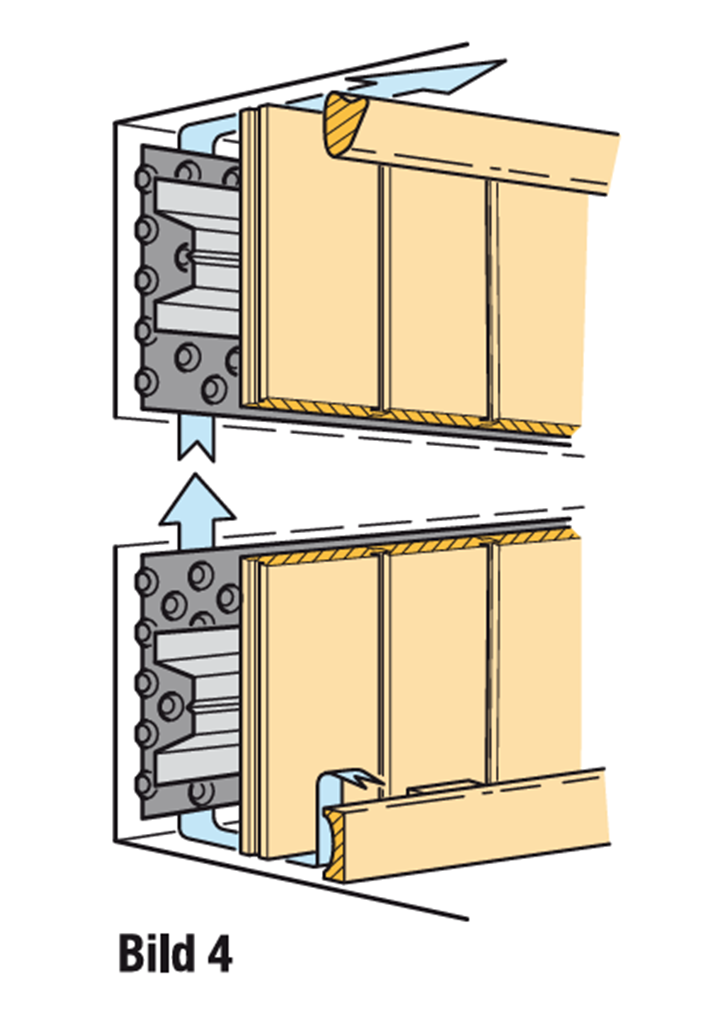
The T-Barrier is mounted on the wall and secured with nails and washers. On top of this, the moisture-sensitive panel or writing material is then mounted. It is important to leave air gaps both at the ceiling and the floor (Image 4). Metal studs are the best option, but if wooden studs are used, you should place a spacer, such as blocks of hard plastic, to avoid direct contact between the wooden studs and the floor.