Important!
- Joint aids such as double-sided joint tape or adhesive tape must be approved for use with T-Wind. Accessories for optimal function should be double-sided joint tape T-Duo or T-Duo Concrete (for concrete), tape T-Flex Outdoor, T-Flex, or Airtight-T. Underlying sealing layers in windows and doors, as well as for special details and penetrations, are made with Flexseal-T and T-Stos.
- Fasteners such as staples should be galvanized and nails hot-dip galvanized.
- Storage and warehousing should always be done packaged or in a way that the wind protection fabric is protected from UV radiation and heat.
- T-Wind Basic/Standard has UV protection (sunlight) corresponding to the construction period (3 months and Pro 4 months, as a wind barrier). Thereafter, the wind barrier should be covered by the facade. For lasting water tightness and adequate weather protection during the summer months, UV exposure should be reduced to a maximum of 6 weeks!
- The material's properties and function remain unchanged regardless of which side is turned inward or outward. However, the inside of the roll is recommended to face outward!
- Unless otherwise stated here, the recommendations in AMA-Hus -21 (JSG.4) apply.
- Minor damages (small holes, punctures, exposed staples) are repaired with durable windproof tape in single width. Larger damages are repaired with a piece of windproof material +150 mm larger than the damage and taped with durable windproof tape in single width all around.
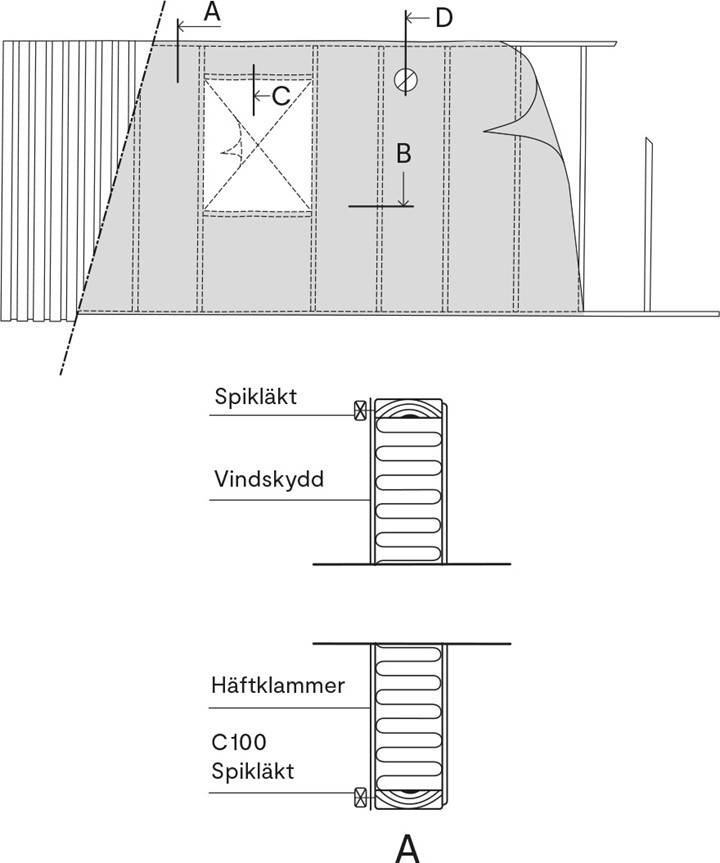
A. Fastening
Roll out the wind protection with the roll's width as the height of the frame. (If narrower widths are desired, the rolls can be cut with a handsaw to the correct size. Otherwise, the wind protection is cut with a knife.) Fasten with staples c100 mm against wood. For steel/metal frames, use double-sided joint tape. The steel/metal surfaces should be dry and clean when the joint tape is pressed on.
NOTE! With this fastening method, the strength against, for example, wind impact can decrease. At the top and bottom, as well as on the sides, the wind protection is clamped with a nail strip (at least 9 x 22 mm) which is nailed with c100mm.
NOTE! If a base plate or equivalent is used at the bottom edge, ensure that the wind protection overlaps!

B. Joining
Roll out the wind protection with the roll's width as the height of the frame. (If narrower widths are desired, the rolls can be cut with a handsaw to the correct size. Otherwise, the wind protection is cut with a knife.) Fasten with staples c100 mm against wood. For steel/metal frames, use double-sided joint tape. The steel/metal surfaces should be dry and clean when the joint tape is pressed on.
NOTE! With this fastening method, the strength against, for example, wind impact can decrease. At the top and bottom, as well as on the sides, the wind protection is clamped with a nail strip (at least 9 x 22 mm) which is nailed with c100mm.
NOTE! If a base plate or equivalent is used at the bottom edge, ensure that the wind protection overlaps!

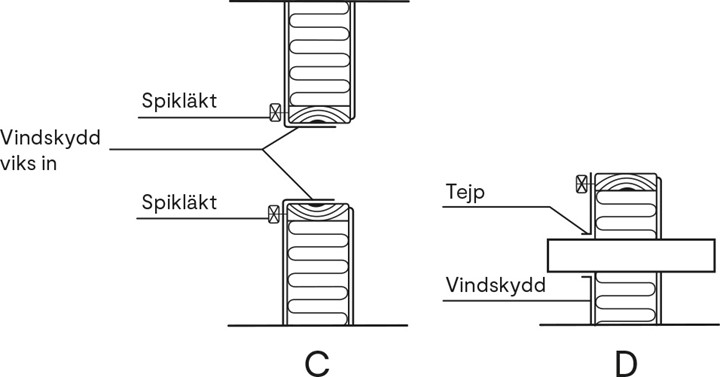
C. Window/Door Openings and D. Penetrations
For doors and windows, the wind barrier is cut during installation and folded in for mechanical attachment to the frame (C). Around the edges, the fabric is primarily secured with battens (minimum 12 x 45 mm). For pipe penetrations, designated collars are used. Alternatively (D) cut a 20 mm smaller hole in the wind barrier. Push the pipe through so that a collar is formed by the elastic wind barrier. Seal the collar around with the intended durable tape for wind protection. The penetration should be supported by the underlying frame studs!
