Important!
Unless otherwise stated here, the latest recommendations in AMA Hus (JSB.6) apply.
- The permanent surface layer determines the minimum roof slope for the underlay, but always at least 1.5° (1:40).
- For mechanical fastening and especially the use of a nail gun, ensure that the nailing is done straight down and with the correct pressure on the substrate, so optimal tightness is achieved against the substrate for the nail head.
- The adhesive edge has aggressive adhesion under normal conditions! In cooler weather (<+10°C), there may sometimes be a need to improve the adhesion. Use a heat gun and gently warm the adhesive surfaces. Press the seam together carefully! In cool weather, rolls should be pre-stored for at least 1 day in a warm storage.
- Be sure to gently load the surface and immediately repair any damage with sealing tape Roofseal-T, roofing adhesive Tätklister K-36, or equivalent repair compound for bitumen waterproofing. For larger damage, use and attach/glue a strip from the underlay fabric.
- Mechanical fastening (open and visible) should be hot-dip galvanized roofing felt nails min 25 x 2.5 mm or concealed fastening double with staples corresponding to at least Rapid 140/10 or with larger staples, leg length 12-15 mm, back width 12.4-15 mm and wire dimension 0.5 x 1.3 mm.
- Always cover with the surface layer (roofing felt, welded waterproofing membrane, or shingles) as soon as possible to avoid exposure to sunlight and adverse weather conditions. During construction, the underlayment can be exposed to sunlight for up to a maximum of three months. In the usage stage, the underlayment should be protected by the outer roof covering.
- Rolls should be stored upright on a flat, dry surface and protected from sun and precipitation.
- T-Roof YEM 1000 is diffusion-tight and when mounted on a wooden substrate, the space underneath should be ventilated according to practice.
1. Installation
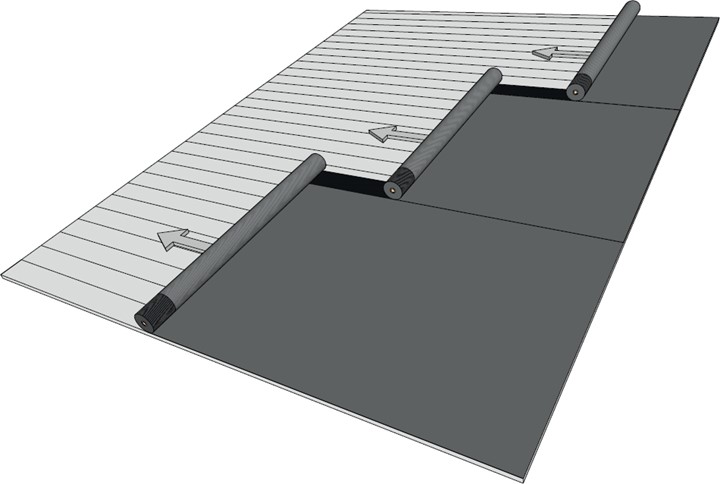
Installation is recommended with sheets across the direction of the roof slope (When covering under welded waterproofing, the underlay should be installed in the same direction!). Rolling is done from right to left so that the side inside the roll becomes the top side unrolled. The sheets are easiest laid from the bottom with overlapping subsequent upwards. The substrate should be dry, even, and stable to avoid deflection and movement. The surface layer determines the nature of the substrate and the minimum slope. For the minimum underlying panel thickness, see table AMA HSD. 1331/1 (AMA-Hus 24). For non-battened substrates, at least 23 mm clapboard wood panel and groove thickness.
NOTE! The space under the wooden base or above the insulation must be ventilated according to standard practice.
For roof slopes steeper than 18° (1:3), the underlayment can also be installed according to the roof slope, from ridge to eaves. Be extra careful to ensure the adhesive edges stick during installation.
2. Gables
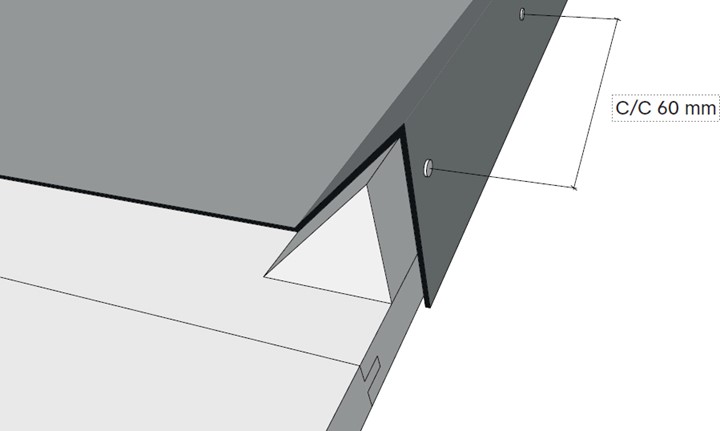
Starting and ending against the gables is best done with a triangular strip that angles the base upwards. The underlay is wrapped around the strip and fastened visibly on the outside.
3. Connectors
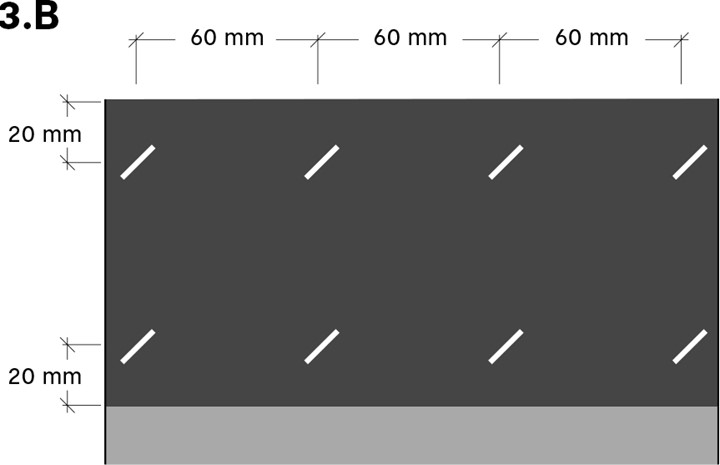
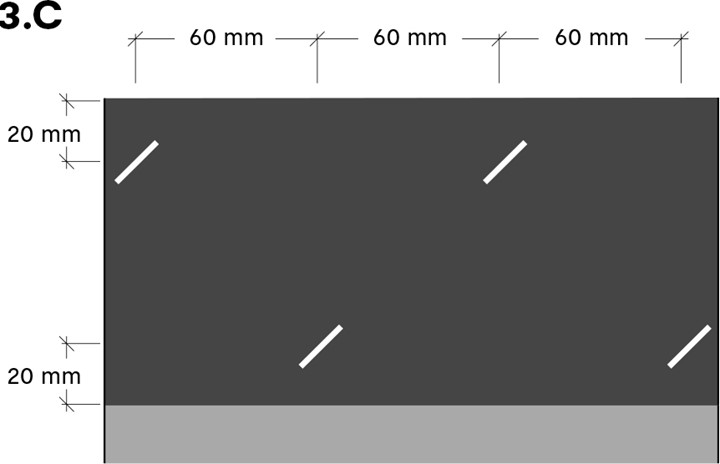
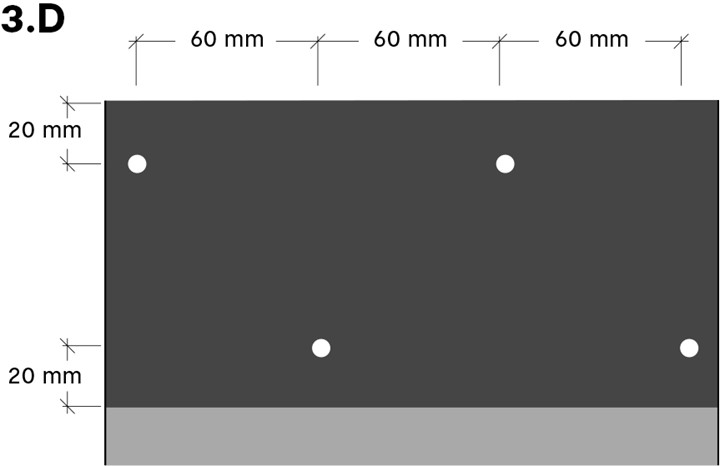
The underlay fabric is mechanically fastened with roofing felt nails min 25 x 2.5 mm (according to fig 3.D) or double with staples corresponding to at least Rapid 140/10 (according to fig 3.B) alternatively with larger staples, leg length 12-15 mm, back width 12.4-15 mm and wire dimension 0.5 x 1.3 mm (according to fig 3.C).
Mechanical fastening occurs along the longitudinal edges hidden in the upper adhesive edge of the sheet. Open and visible fastening (through both sheets in the overlap) can alternatively be done with only roofing felt nails and at slopes from 14° (approx. 1:4) and upwards. The sheet is temporarily fastened at the top edge (approx. 1 m between fastenings) and adjusted at the bottom edge. Overlapped in a straight edge line, the protective films are then removed simultaneously with careful pressure afterwards. Overlap occurs with adhesive edge against adhesive edge corresponding to the recommended overlap.
NOTE! Vid dold mekanisk infästning kontrollera noga hållfastheten av skarven i efterhand.
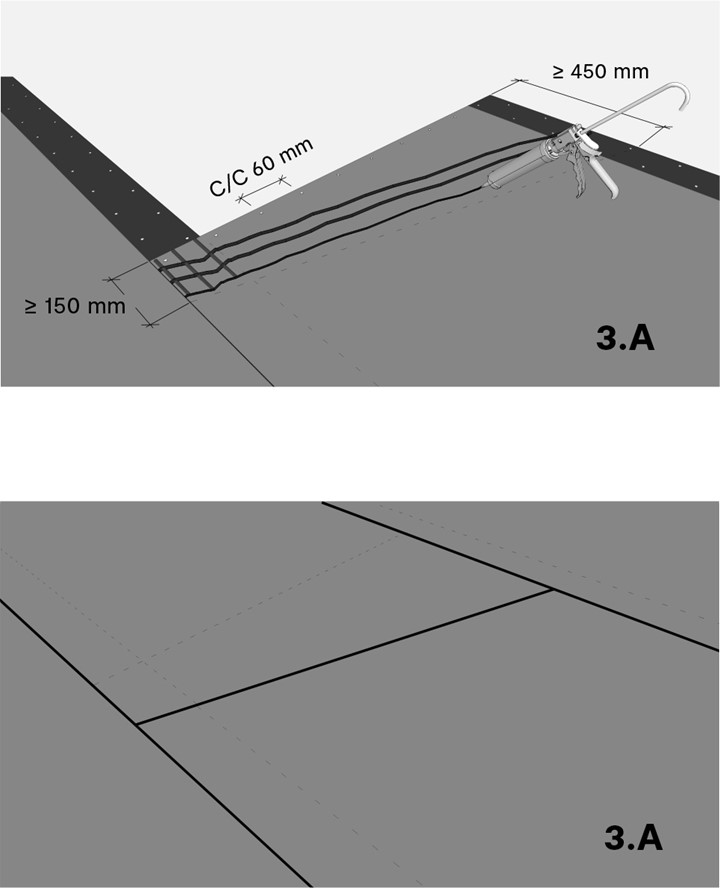
Consider more challenging weather conditions and ensure any temporary fixation of overlaps or protective covering until the permanent surface layer is installed! Alternatively, use battens if possible! At transverse joints, the overlapping sheet at the lower edge should overlap at least 150 mm and then be cut diagonally upwards so that the overlap at the top becomes 450 mm (150 + 300 mm). The lower sheet is fastened at the edge with mechanical fastening at a center distance of 60 mm (according to fig 3.A). Transverse joints should be glued down with 3 strings of roofing felt adhesive equivalent to Tätklister K-36.
4.
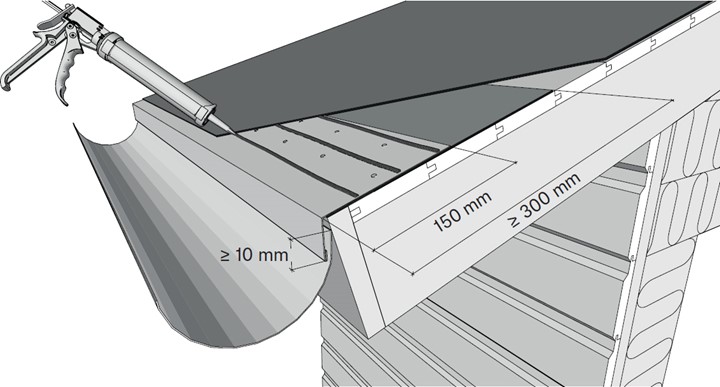
At the eaves, the first strip is attached at the lower edge against the recommended eaves flashing with the adhesive edge (Do not forget to remove the protective film!) and 3 strings of roofing felt adhesive equivalent to Sealant K-36 (see fig 4). The end is positioned a bit up (about 20 mm) so that it is concealed by the protective surface layer in the working environment. Adhesion should be done on cleaned metal. The eaves flashing should be mounted on a strip of underlay above the wooden substrate (e.g., T-Roof Multi Strip).
For surface layers of welded waterproofing or self-adhesive roofing felt, install the eaves flashing on top of the first layer of the underlayment.
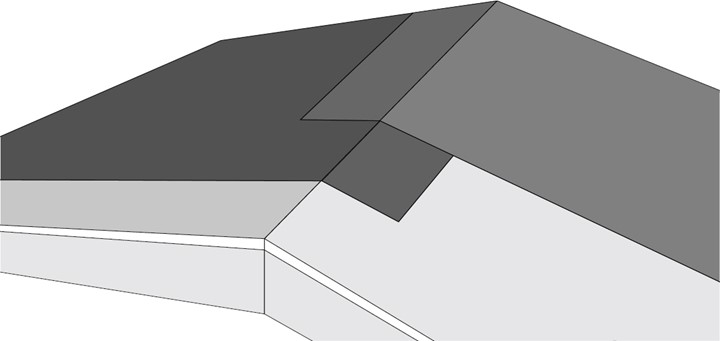
5. Nock
At the ridge, the underlay on both sides should overlap the opposite side by at least 150mm. The lower sheet is fastened with roofing felt nails as a seam (according to fig 3.B) and the overlapping is glued down with Sealant K-36 or equivalent (3 strings with a total width of 80 mm) and nailed as a seam (according to fig 3.D). Open and visible! This solution refers to a NON-ventilated ridge, and the roof should then also be ventilated via ventilation openings in the gables or roof-mounted roof vents/caps.
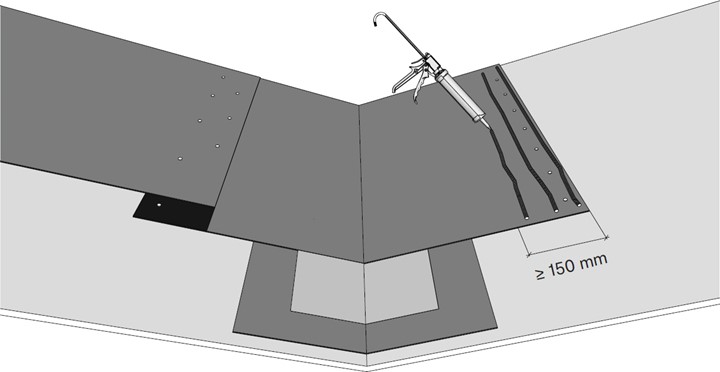
6. Angle gutter
First ensure that the valley gutter has a stable and fixed base with a metal underlay (minimum 300 mm wide). The underlay should be provided with a strip of underlay fabric underneath. The underlay should be nailed to mechanically hold the roof sides together. In a valley gutter with valley metal, the gutter should be provided with a strip of underlay fabric (according to fig 6). The strip in the valley gutter is fastened at the ridge and at the outer edges with, for example, roofing felt nails with a center distance of 150 mm. Then let the adjoining strips from each roof side overlap the valley strip by at least 150 mm. The fastening is done with roofing felt adhesive equivalent to Sealant K-36 (3 string) and with mechanical open fastening as a joint.
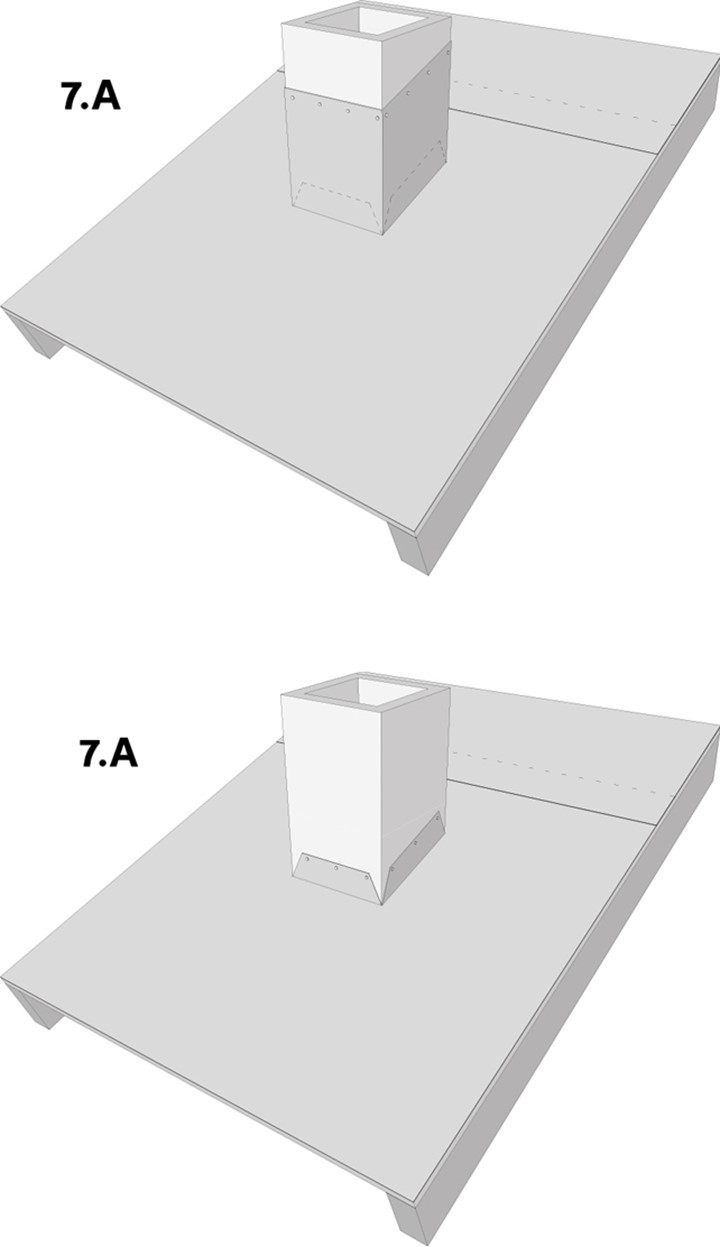
7. Implementation options A, B, and C
A. Vid fyrkantiga genomföringar (skorsten, ventilationskanal m m) skall underlagsduken skäras till, vikas upp och spikas fast i botten (enl fig 7.A). Klä därefter in uppviket med remsa av underlagsduken runt om med överlapp (minst 300 mm högt). Fäst med spik och klistra (80 mm brett eller 3 strängar) eller spika nertill. Spikning sker med centrumavstånd minst 100 mm. Klistring görs med Tätklister K-36 eller motsvarande. Hörnen tätas extra med Tätklister K-36 eller motsvarande fogmassa alternativt med tätningstejp tak Roofseal-T.
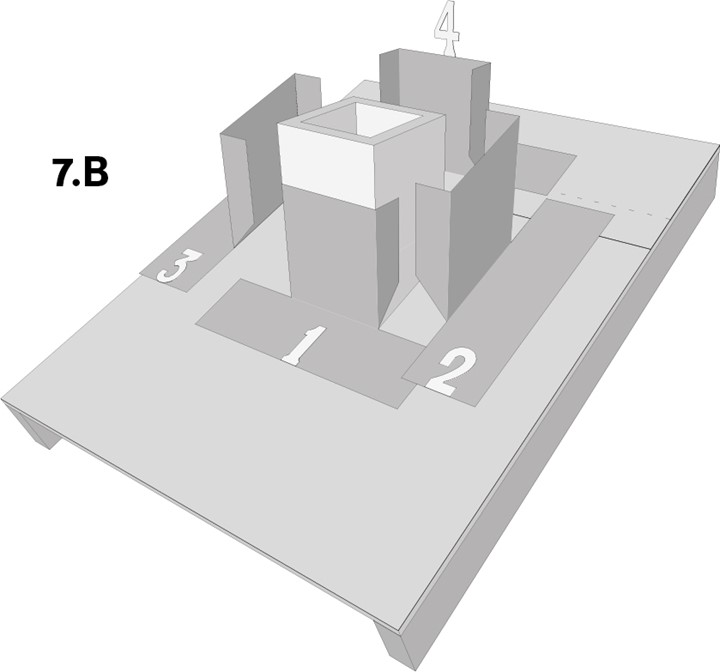
B. For square pass-throughs and lower roof slopes (≤12°/1:5), higher safety and installation with glued collars are recommended (see fig 7.B). Cut out four sides from the underlay (overlap 150 mm), trim and attach the bottom one first, followed by the next two sides, and finish with the rear one towards the ridge. Gluing is done on all edges with Sealant K-36 or equivalent (80 mm wide or with 3 strings).
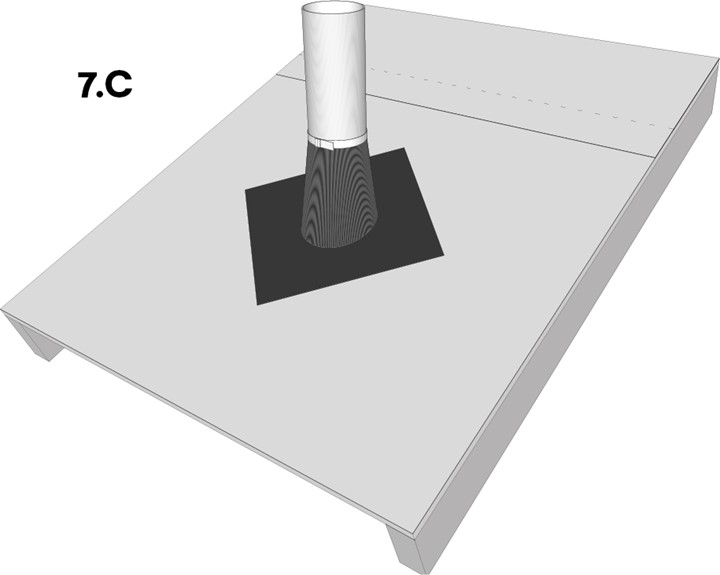
C. För runda genomföringar som hål för ventilationsrör m m används stos som självklistrande T-Stos butyl eller helgummistos (enl fig 7.C). Stosens fot helklistras ned mot underlaget och underlagsduken. För helgummistos skall klistring ske med Tätklister K-36 eller motsvarande. Vid fyrkantig fot ställs en av stosens hörn, vid klistringen, rakt upp mot nock. Stos skall förslutas i toppen med klämring eller minst 2 varv av beständig tätningstejp.
8. Vertical connection (wall)
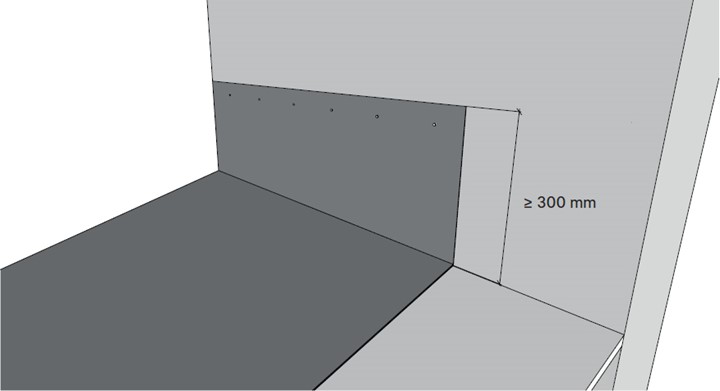
At the connection where the roof underlay meets the wall at the top, an extension on the adjoining wall should be made, at least 300 mm. The extension is made under the facade and attached to the wind protection layer with roofing felt nails at a center distance of 100 mm and 30 mm from the edge.